Tuesday, July 19, 2011

Diving Apps for iPad owners

With the iPad growing in popularity (nearly 25 million of them around now) it was only a matter of time before divers would see dedicated iPad apps, we take a look at five of our favourites…

1) Dive Log $11.99

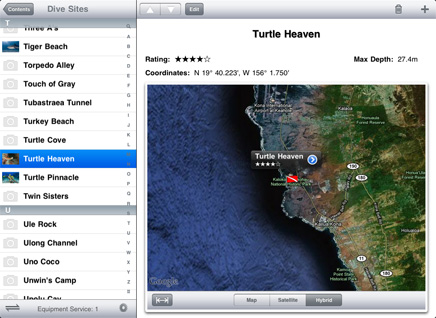
One of the more expensive iPad apps, but that reflects in it’s quality. Also available for your iPhone, Mac or Windows computer. Add dive locations, air mixes, bottom times and site statistics. Use photos of buddies, interact with Google Maps, capture GPS co-ordinates and build up a comprehensive dive log that can be easily accessed on multiple devices.

Dive stats are nicely presented; giving you overall bottom time, average depth and a host of other dive statistics. If you’re a tech geek and want something a little less soggy than a paper log book, Dive Log is worth every cent.

2) Dive Training $FREE


Most divers would have seen this magazine knocking around their local dive shop. Dive Training has a twenty year legacy dedicated to education-based articles. Well written and informative there is always something worth while in every issue for divers of all experience.

The App is free, as are the issues (at time of press) so there really is no reason to not have this on your iPad. Navigation is easy, but pages are taken directly from the print product, so don’t expect flashy animations and video content. It’s simple, effective and well worthy of your time.

3) London Diving Chamber


Firstly, you don’t have to be in London to benefit from this iPad diving App, the overall focus of which is health and medical attention. The LDC App has several simple elements, a pre-dive checklist focusing on physical checks, a simple but effective log book (not as comprehensive as the Dive Log, but a handy addition if the price tag of $11.99 puts you off the above) and a directory of medical terminology.

The LDC App can help you locate a Hyperbaric chamber, either by entering an area name, or by automatically using your current GPS location. Chambers can then be pin-pointed on Google Maps, incredibly good for making emergency action plans or when visiting new, unfamiliar dive sites.

Finally they offer “Diving Incident”, a series of yes and no questions that help determine a medical problem within a diver. I’d recommend a PADI Rescue Diver course before searching in your dive bag for an iPad, but it’s a good learning tool if nothing else. Add to this a comprehensive A-Z of diving medical terms and you have an excellent, free iPad app worth it’s weight in led.

4) Earth Periodical $FREE


If you’re a diver, there is more than a fair chance you have a keen interest in conservation and exploration. Earth Periodical is a new, free magazine made just for you. Now in it’s second issue the magazine offers unique interactive content, original articles by experts, video content and interactive an quiz. All for free. What more could an avid carer of our planet ask for? Put simply it’s aim is to educate, entertain and inspire people. From saving sharks, to space shuttle Discovery, from natural history news to equipment reviews. EP aims to give you something interesting. Perfect for your surface interval or when you’re waiting for tanks to get filled.

5) My Reef Aquarium 3D HD $2.99


iPads do fun stuff. You need a balance between serious dive logs and entertainment. My Reef Aquarium 3D HD is basically an interactive aquarium for your iPad. Choose your tank, the background image and the fish that inhabit it. Feed the fish, knock on the glass to get their attention or simply sit it on your desk and day dream about your next dive in the Caribbean.

If you have young kids, this App will be the best thing you ever buy. Whether they are a year old or closer to ten, My Reef 3D HD will have them glued, interacting and best yet, quiet for hours! Worth the price alone.

Other Apps of interest:

iMixer EANx (FREE)

DIVE Magazine (Free App, pay for issues)

101 Most Popular Dive sites of the Red Sea ($9.99)

Navy Diving Manual ($4.99)

Is Your Sunscreen Killing Corals?

With the summer season fast approaching, there has been a resurgence of concern over water-enthusiasts’ sunscreens potentially harming fragile coral reef systems. The need for sun protection is undeniable but as swimmers, divers and general ocean-lovers, how do we ensure that the products we out on our body are not harming corals?

In this article, I’m going to present you with all the facts and evidence linking coral bleaching and degraded reefs to swimmers’ sunscreen and determine the legitimacy of these claims.

The Claim

Four common sunscreen components can activate dormant viruses in coral’s symbiotic algae, known as zooxanthellae, that live within the reef’s tissues. The UV filters implicated are butylparaben, ethylhexylmethoxycinnamate, benzophenone-3 and 4-methylbenzylidene camphor. These ingredients, commonly found in many chemical sunscreens, are touted to cause complete coral bleaching at very low concentrations.

These sunblock chemicals stimulate viral replication until coral’s zooxanthallae explore, releasing viruses into the surrounding seawater, where they can infect neighboring coral reef systems. Claims have been made that about 4,000 to 6,000 metric tons of sunblock from swimmers wash-off into the world’s oceans annually, and that up to 10% of coral reefs are threatened by sunscreen-induced bleaching.

The Evidence

The study by an Italian team of scientists, R. Danovaro, L. Bongiorni, C. Corinaldesi, et al., published in Environmental Health Perspectives is the one piece of research done in support of sunscreen chemicals killing zooxanthallae and subsequently causing coral bleaching.

The Set-up

Coral branches of Acropora spp. and others were taken from tropical reefs in the Atlantic, Indian, and Pacific Oceans, as well as the Red Sea.

In situ and laboratory experiments were conducted by adding sunscreen aliquots and common UV filters to the corals. Using epifluorescence and microscopy, the zooxanthellae were monitored for viral infection and transmission.

The Findings

The Italian group of scientists found that the sunscreen ingredients killed coral and zooxnathallae withing 4 days by stimulating viruses (a 15-fold increase was observed in infection).

Experiments applying various sunscreen SPFs and concentrations to several coral species from different sites all proved to bleach corals.

The researchers concluded that based on a theoretical estimate of number of tourists using sunscreens in reef areas that up to 10% of the world’s coral reefs could be at risk for bleaching via sunscreen wash-off.

Also of note, R. Danovara et. al found that the coral bleaching effect was not dose-dependent, so reefs exposed even to very small concentrations of sunscreen are at risk.

The Verdict

Previous research has indicated that sunscreens can potentially bioaccumulate in the food chain and there may be a breakdown of sunscreens into toxic substances, until this most recent study, a link has never been shown between swimmers’ sunblock and coral reef bleaching (Leon-Gonzalez, 2011; Morohoshia, 2005).

Currently, there has only been one study published linking sunblock chemicals to the death of coral reefs published by R. Danovara, et al. And while published in a peer-reviewed journal, meaning the article has been critically assessed by a panel of scholars in the author’s, more studies will be needed to effectively conclude that swimmer’s sunscreens are putting 10% of the world’s coral reefs at risk of bleaching.

A completely in laboratory experiment cannot possible conclude that 10% of the world’s reef systems (outside of the experiment’s specific lab conditions) are at risk for bleaching from swimmers’ sunscreens.

I have no doubt under the exact laboratory conditions utilized in this study that corals will bleach. Corals are highly sensitive organisms and prone to bleaching at the slightest stress (sensitivity varies by species of course).

First, fracturing corals into nubbins and transporting them out of their ocean environment is always a risky business. It is very difficult to maintain corals (especially less hardy species such as Acropora) in lab conditions. The coral pieces used in experiments may have bleached with the addition of sunscreen aliquots because they were already highly stressed from the transport or due to other factors of the lab set-up (improper water temperature, poor water circulation, etc.). This may not be the case, but it was not discussed in the paper.

Second, the experimental set-up of immersing hands covered with sunscreen agents in a small water volume containing the coral pieces subjects the corals to a much higher concentration of sunscreen than they may experience out in the open ocean.

R. Danovara does indicate that even at low toxicity levels of sunscreen agents, corals may bleach. However, I’d like to see the results replicated a number of times and then more testing done in the ocean to confirm that sunscreen wash-off and the amount it is diluted in the sea actually causes reef bleaching.

A coral expert at the Florida Institute of Technology (FIT), Robert van Woesik, also questions whether the conditions utilized in the study truly reflect those found in nature.

This study certainly does have large implications for marine scientists running lab experiments with corals or managers of coral nurseries, as clearly a chemical sunscreen could cause bleaching and mortality of your coral specimens during testing in small water volumes.

However, until more research comes out, I’m still a firm believer that other human-induced pressures, such as pollution, sedimentation, overfishing and global warming, are much larger contributors to reef degradation than swimmers’ sunscreens.

Eco-Friendly Sunscreens

Even though I’m not in full agreement with the study discussed above, I do agree that ingredients in chemical sunscreens may be bad for human health as well as have the potential to bioaccumulate in the food chain.

If you’re looking for “reef safe” greener sunscreens, as I have been, I’ve got you covered! Whether you believe in the potential impact of chemical sunblocks on corals, you can reduce any risk to reef and ocean systems by choosing only sunscreens with physical UV filters (ie. titanium dioxide and zinc oxide). There are also a couple eco-friendly chemical sunscreens, just be sure to avoid sunblocks with octylmethoxycinnamate, benzophenone-3, parabens or octocrylene.

Here are my sunscreen recommendations:

  • Badger produces some great natural, water-resistant sunscreens and is rated highest for safety and efficacy by the Environmental Working Group.
  • Caribbean Solutions has another reef-safe, natural sunblock.
  • Loving Naturals produces a zinc-based sunscreen with 100% natural ingredients.
  • Reef Safe (made by Tropical Seas) claims to be completely for marine life.
  • And of course, staying in the shade and wearing hats and cover-ups are also great ways to protect yourself from the sun

5 iPhone Apps for Divers

5 iPhone Apps for divers by Russell Clark – Earth Periodical Magazine Avid diver? There’s an App for that. In fact there are loads, we’re going to take a look at five iPhone applications that can make your scuba diver life a little easier.

1) Dive Time, $3.99 A very simple and useful app, Dive Time has the largest database of diving resources on the net with over 12,500 dive sites world wide and over 8,500 dive shops. Perfect for the traveling diver or even a local that wants more variation from their dives. Simple to use with search by area or from your current location. Integrated with Google maps and additional dive site details like depth, description and average visibility. A must have.

2) Dive Log, $9.99 Slightly expensive for an iPhone app, but Dive Log has become a regular piece of dive kit and worth the price tag. Basically a portable logbook application than can synchronise with your home desktop Mac or PC. Add dive locations with photos, dive buddies from your contact list, dive statistics such as depth, time, gear used and conditions. Dive Log then displays all your dive statistics on one handy page; overall dive time, average depth, deepest dive and others. Easy to back up and sync and a handy tool for referencing your own adventures.

3) Scuba Exam, $2.99 Whether you are new to diving or just want a fun little app to pass away time on a surface interval. Scuba Exam is a fun application, well thought out and well written. Made as an educational tool, the app offers a scuba quiz aimed mainly at beginners, a trickier dive table quiz plus diving terminology a-z and a selection of diving theory articles. An excellent study aid and great to brush up your knowledge.

4) PADI, $FREE A simple PADI dive shop locator. Type in a city, zip code, county or current location and the app will display either a map or list of your nearest PADI dive shops. Simple, easy to use and reliable. Definitely worth having in your pocket. And it’s not every day PADI give something away for free!

5) iDive Nitrox, $0.99 There are a few nitrox calculation apps for the iPhone. So far every diver with an iPhone uses a different one based on their personal preference. They all basically do the same job. I like iDive Nitrox as it’s a little less clunky than some of the others and gets straight to the point. It offers a simple calculator for maximum operating depth, contingency depth, equivalent air depth and partial pressure of O2. All done by using the handy sliders. Quick easy and reliable. Sold!

Other notable iPhone apps:

London Diving Chamber

World Tides

iDeco Pro

iScuba Buddy

Dive Mate GPS

NPAA Ocean Buoys

Dive Buddy Russell Clark is a cold water diver and founder of Earth Periodical, conservation and exploration iPad magazine, available for free from the iTunes store here.

10 Easy Steps to Protect Coral Reefs

Feel overwhelmed by global climate change? Ocean acidification? Worldwide coral bleaching?

There ARE ways you can make a positive impact on this Earth and help preserve precious coral reef systems, whether you are a scientist, policy-maker or concerned citizen.

1. Learn and Educate. Read, watch and listen to everything you can about marine conservation and coral reefs and share what you learn with others. The more you learn, the more informed your actions to protect our oceans & reefs will be. At Project Blue Hope, we try to keep you as up-to-date as possible with the marine conservation, policy and science news.

2. Petition the Government. You have a voice, so use it! Contact your government representatives and call for increased protection for coral reefs via the expansion of marine protected areas. Demand the pollution of our oceans be put to an end.

3. Support “Green” Business. Businesses that are eco-friendly are also reef-friendly. Only use your money to support businesses that are dedicated to sustainable practices. A good way to find such establishments is via the National Green Pages. Also, if you own stock in a company, you can use your proxy ballot to push big businesses to “go green” and stop destructive fishing practices.

4. Volunteer on Vacation. If you don’t live near a coral reef, then go on vacation to visit one and volunteer at the local marine park. There are many organizations, such as REEF, Blue Ventures and Oceans Watch, that you travel with to volunteer your diving skills and do coral surveys and ocean clean-ups.

5. Use Only Organic/ Eco-Friendly Fertilizers. Even if you live far inland, fertilizer products still flow into the water system. Ultimately, fertilizers will run out to pollute the sea and harm coral reefs and marine life.

6. Consume Sustainable Seafood. Practice mindful eating and don’t consume overfished Bluefin Tuna, Atlantic Cod, Blue Marlin, Chilean Seabass, Farmed Salmon, Snapper or Grouper (to name a few). Seafood Watch’s pocket guides and online database are useful tools for determining whether your seafood is sustainable or not. If you are at a restaurant that serves these fish, fill out a comment card or talk with the chef to voice your opinion about their unsustainable seafood menu choices.

7. Lower Your Carbon Footprint. Help reduce pollution by walking, biking or utilizing public transportation vs. driving. Global (and ocean) warming is largely due to fossil fuel emissions from cars and industry, which leads to coral bleaching (and death). Also, planting a tree helps reverse global warming and reduce run-off into the seas.

8. Dive & Snorkel Responsibly. If you have the privilege to slip beneath the ocean’s surface, please, do not touch the reef or anchor your boat on the coral. Corals are delicate animals, despite their “rocky” appearance, and contact with the coral can damage and sometimes kill them.

9. Use Less Water. When you use water conservatively, you create less wastewater and run-off that will pollute our oceans. Also, properly dispose of your trash, as litter that ends up in the sea can harm fish & the reefs.

10. Spread the Message of “Blue Hope.” As divers, we have a close association with coral reef systems that few get to experience. The profound respect and wonder we feel for the oceans is a feeling we should all try to share. Share your excitement for coral reefs and commitment to protecting them with as many people as you can.

These ten action items are easy, yet effective when enacted collectively. Your actions and the actions of your local community can make a difference every day.

Scuba Wetsuit Care 101: Removing Odors & Extending Suit Life

If you want your wetsuit to last as long as possible, a bit of proper wetsuit care is all you need. The difference between a wetsuit with a 1 year life and 6 year life depends, to a certain extent, on how often you are using it. But to a larger extent, how well you take care of your wetsuit is going to either quicken or slow its deterioration. Below are 13 care tips for extending wetsuit life.

1. Neoprene and Hot Water Are Not Friends

Neoprene loses some of the flexibility when soaked in hot water. So hop in a cold shower with your wetsuit on or only soak it in lukewarm water.

2. Sun & UV Rays Deteriorate Neoprene

Sun and UV rays both cause your neoprene wetsuit to age more quickly. So if you need your scuba suit to dry, don’t try to hasten the process by placing it in the sun. In the long run, the neoprene will become hard and lose flexibility.

3. Don’t Put Your Wetsuit in a Hot Trunk

If your car has been sitting in a parking lot on a hot day, then putting your wet suit into the trunk is not a great idea. This will essentially “cook” your gear, increasing smells and breeding bacteria.

4. Turn Your Wetsuit Inside Out to Dry

To dry your wetsuit, its best to first turn it inside out before hanging it up. By turning the suit inside out, flexibility will be maintained on the outer side. This means that even if the wetsuit it not 100% dry to next time you put it on, you’ll for sure be crawling into a drier side.

5. Carefully Store

Carefully store your dry wet suit on a flat surface or hang on a wide coat hanger in your closet.

6. Quickly Clean & Dry Your Suit

After a dive, don’t let your wet wetsuit sit in your dive bag, all stinky, messy and sandy. Clean the suit quickly and dry it completely before storing away. This type of regular wetsuit care will be sure to increase its lifespan.

7. Avoid “Messy Dressing”

If you’re doing a beach or shore dive, keep your wetsuit up and aware from the mud/ sand. Its not so comfortable to pull on a sandy wetsuit! Also, when you take off your wetsuit, stand on pavement, a rock, your changing bag, grass or anything besides the middle of the sandy beach.

8. Wetsuits Don’t Belong in the Washer

Neoprene wetsuits must be handled with care and can’t be put through the washer and dryer. You have to hand wash and air dry.

9. Can I Iron my Wetsuit? …. No!

It’s a no-brainer that you should not iron your wetsuit. Just look at the rubber areas around the zippers and knees. Also, if you were to iron the neoprene, that amount of excessive heat would make the suit very stiff.

10. Bleach is Off-Limits

Strong washing agents, such as bleach, are way too harsh for your neoprene wetsuit (not to mention the discoloration that will occur). There are some mild cleansing agents, such as “Sink the Stink” and “Trident Wetsuit Cleaner” that you can purchase from your local dive shop, but regular dish detergent will work just as well (read on to find out how to get rid of wetsuit smells on your own).

11. Why Does My Wetsuit Stink?

Your wetsuit can stink if it was left, wet, in a bag for a while and wasn’t rinsed. The smell comes from bacteria that begin to feed on the normal sweat and body oils and odors clinging to the wetsuit after we use it. Also, if you urinate in your wetsuit, the pee can leave an odor behind.

12. How to Get Ride of Wetsuit Smells & Odors

As I mentioned, there are special cleaning soaps and solutions for getting rid of wetsuit odors, but I personally, find that there is an easy, more economical way to erase suit smells. Here is my homemade recipe for washing smelly wetsuits:

  • 1st: Fill the tub up ¼ of the way with fresh, warm (not hot) water.
  • 2nd: Add a couple tablespoons of dish washing detergent, just enough to get a dilute bubbly water bath for soaking.
    Note: Some people will use laundry detergent, but I think even that is too harsh for neoprene (and tougher to rinse off). The only laundry detergent to consider using is Woolite.
  • 3rd: Wash your wetsuit in the tub of soap and the detergent will break down the body oils and odors. In addition, it will help wash away the bacteria that caused the smell in the first place .
  • 4th: Rinse your wetsuit in fresh water in order to get all the detergent off. Then hang your wetsuit up to dry in the fresh air (away from direct sunlight).
  • 5th: Every few weeks, repeat this process to keep your wetsuit completely odor-free!

Get Rid of the Blue in your Scuba Photos

Are you sick and tired of your photos coming out Blue? You may be new to underwater photography so you should no one simple trick. What is it? White Balance!
You need to make sure you white balance underwater at depth. Think of you camera as if the lens is the eye and the complex system in it is a brain. When humans dive underwater the color spectrum is altered and this is the case for your camera.

Adjusting your whit balance underwater tells your camera that what is white underwater. You need to make sure you have a white card with you during your dive. Adjust your white balance for the depth you are photographing at, make sure that if your depth changes by more than 10ft/3m you need white balance again. Note if you are using a strobe then shoot the white balance card at full power. Your strobe or flash emits light at a certain color temp, usually 5500K, similar to sunlight, but it depends on the strobe. Most strobes are between 4800K and 5600K. The color temp of the light will change as it passes through water, and reds are filtered out. Remember to switch your white-balance back to auto when using the flash, otherwise your photo will look very red.

If you are lighting up a close subject with your strobe or internal flash, your color temp should be set to Auto. If you are not happy with the color you are getting, which may happen in low-end compact cameras, you can try setting it to sunny or flash, which are both around 5500K. Setting the white balance to cloudy (6000-6500K) when using strobes will usually result in photos that are a little too orange, unless the subject is a few feet away.

White Balance Mistakes:

  • Any white balance mistakes can be easily corrected if you are shooting in RAW
  • Setting a manual white balance, and then forgetting to switch to auto white-balance and using your flash or strobes will result in a nice red photo, oops!
  • Taking an ambient light shot underwater , and leaving the white balance on auto, sunny, or flash will result in a mostly blue photo void of color, especially if you are deeper than 10-15ft deep.
  • Make sure you increase the contrast of your ambient-light photo afterwards in photoshop.

Tank Cave - Cave Diving Australia

Cave Name: Tank Cave
Reference: 5L-230
Cave Area: Lower South East
Description: Named because a water tank used to rest right over the top of the entrance, Tank Cave is an extensive, maze like system with over 8km of diveable passage which makes it one of the longest underwater caves in Australia.
Owner/Manager: Rob Dycer
Access: Via CDAA. Cave leased to CDAA..

The South Australian region near Mt Gambier is known of it’s many sinkholes and caves. One particular cave that stands out amongst the rest is Tank Cave. Tank Cave is probably the most complex and biggest cave system in Australia, with more than eight kilometers of underwater passages. The cave is relatively shallow a max depth around 65ft (20m). This system gets its name from the fact that there used to be a water tank directly over the top of the entrance.

Rumored since the late 1960s as a “cave diving site” of some type, this amazingly extensive feature is today considered by many to be the the best cave diving as far as South Australian cave diving sites

The Tank Cave entrance is on private property and the Cave Divers Association of Australia (CDAA) strictly control access to the dive site. The complicated nature of the cave system, requires a strict familiarization process that allows cave divers to get to know the cave step by step. You must go through this process before you are allowed access to the site, the clear benefit means that every cave diver is very familiar with all the main passages of Tank Cave before they can explore further.

Padi Mobile Application


Padi has just stepped up their game by coming out with a new Padi Mobile Application for both Android and iPhone devices. It’s a good start for Padi, allowing users to find a Padi Dive anywhere in the world.

You are able to use your phone to search by city, state or zip/postal code for PADI Dive Centers or Resorts all over the world —or select your current location and find the closest PADI Dive Center or Resort.

The PADI App gives you the option to view your search results in a list format starting with the closest Dive Centers and Resorts, or map format. Click on the listing and you’ll get the center’s contact information and PADI Five-Star status (PADI store rating). With some listings you’ll even get things like the PADI courses offered at that facility, brands of gear they carry and more.

I’m sure that this is just a start for the Padi mobile application. As there is much more function that should be enabled. Like dive logs, buddy finders… let’s see.. maybe Scuba Diver Life will beat them to the finish line.

Decompression Sickness & Scuba Diving

Decompression Sickness (DCS), as it is commonly know, is caused by a build up of nitrogen bubbles in the body. When we breathe underwater, approximately 79 of the air (depending on gas blend) we’re breathing is nitrogen. As we descend deeper in water, the pressure around our bodies increases, causing nitrogen to be absorbed into our body tissues.

Decompression Sickness is the term uses to describe the illness and effects that result from a reduction in the ambient pressure surrounding the human body.


As long as the diver remains at pressure, the gas presents no problem. If the pressure is reduced too quickly, however, the nitrogen comes out of solution and forms bubbles in the tissues and bloodstream. This commonly occurs as a result of violating or approaching too closely the diving table limits, but it can also occur even when accepted guidelines have been followed. ( Like in the video above)

Bubbles forming in or near joints are the presumed cause of the joint pain of a classical “bend.” When high levels of bubbles occur, complex reactions can take place in the body, usually in the spinal cord or brain. Numbness, paralysis and disorders of higher cerebral function may result. If great amounts of decompression are missed and large numbers of bubbles enter the venous bloodstream, congestive symptoms in the lung and circulatory shock can then occur.

The diagnosis of DCS is made on the basis of signs and/or symptoms after a dive or altitude exposure.

There are two types of DCS

Type 1: Type 1 DCS is the least serious form of DCS. It usually involves pain in the body and is usually not an immediate life threat. It is important to understand that type 1 DCS can be warning signs of type 2 DCS.

  • Cutaneous Decompression Sickness
    This occurs when nitrogen bubbles come out of solution in skin capillaries. Resulting in red rashes, often near the chest and shoulders.
  • Joint and Limb Pain Decompression Sickness
    This type is recognized by aching and or pain in the joints. The pain can be in one place or it can move around the joint.

Type 2: Type 2 DSC is more serious and be life threatening. Usually effecting the nervous system.

  • Neurological Decompression Sickness
    When nitrogen bubbles affect the nervous system they can cause problems throughout the body. This type of Decompression Sickness normally shows as tingling, numbness, respiratory problems, and unconsciousness. Symptoms can spread quickly and if left untreated can lead to paralysis or even death.
  • Pulmonary Decompression Sickness
    This is a rare form of Decompression Sickness that occurs when bubbles form in lung capillaries. Fortunately, the majority of the time bubbles dissolve naturally through the lungs. However, it is possible for them to interrupt blood flow to the lungs which can lead to serious and life-threatening respiratory and heart problems.
  • Cerebral Decompression Sickness
    It is possible for bubbles that make their way into the arterial blood stream to move to the brain and to cause an arterial gas embolism. This is extremely dangerous and can be identified by symptoms such as blurred vision, headaches, confusion, and unconsciousness.

Symptoms of DCS

  • Extreme Fatigue
  • Joint and Limb Pain
  • Tingling
  • Numbness
  • Red Rash on Skin
  • Respiratory Problems
  • Heart Problems
  • Dizziness
  • Blurred Vision
  • Headaches
  • Confusion
  • Unconsciousness
  • Ringing of the Ears
  • Vertigo
  • Stomach Sickness

Signs of DCS

  • Skin may show a blotchy rash
  • Paralysis, muscle weakness
  • Difficulty urinating
  • Confusion, personality changes, bizarre behavior
  • Amnesia, tremors
  • Staggering
  • Coughing up bloody, frothy sputum
  • Collapse or unconsciousness

** Symptoms and signs usually appear within 15 minutes to 12 hours after surfacing; but in severe cases, symptoms may appear before surfacing or immediately afterwards. Delayed occurrence of symptoms is rare, but it does occur, especially if air travel follows diving.

Preventing Decompression Illness:

You can help minimize the risk of DSC by using a Dive Planner or a diver computer properly. You also need to follow other dive safety practices that you should have learned in your scuba diving training.

There are many things you should be aware of when diving:

-Never dive to the limits: always have a margin before you hit your dive/table limit

- Fat: Nitrogen dissolves easily into fat tissue. People with a larger ration of fat to body weight may absorb more nitrogen when diving.

- Age: As you get older your circulatory system becomes less efficient, affecting nitrogen elimination.

-Alcohol: Any type of alcohol before or right after a dive can accelerate and alert your circulation.

-Cold Water: Diving in cold water can cause your extremities to receive less circulation as they cool, this effects nitrogen elimination.

-Hot shower/bath: Hot showers and baths after a dive cause skill capillaries to dilate, which will draw blood away from other areas. These areas will then eliminate nitrogen more slowly.

GoPro HD HERO camera: Holly Beck and the Whaleshark

Scuba Diving for Beginners : How to Use Scuba BCD


There are two popular BCD styles are the jacket style and vest style. Most scuba resorts and organizations rent out jacket style BCDs these days. The video above showcases a jacket style BCD.

The BCD has several functions & features:

  • A back-plate and straps to hold the divers air tank
  • Straps to hold your gauges and octopuses,
  • Newer BCDs have integrated weight systems – allowing divers to place their weights inside their BCD, instead of using a weight belt.
  • A low pressure direct feed that transports gas from diving cylinder and diving regulator to the BC.
  • A vent valve that allows gas to escape from the bladders of the BC.
  • An inflation valve that allows gas from the direct feed into the bladders of the BC.
  • An over pressurization valve that automatically vents the bladders if the diver over inflates the BC by ascending or by injecting too much gas.
  • A harness that the diver wears with straps around the torso and over the shoulders
  • D rings or other anchor points, for clipping on other equipment such as torches, strobes, reels, cameras and stage cylinders

Open Water - Padi Certification

The open water course will be the standardized training which most individuals complete while studying diving. It’s recognized internationally and permits a diver to finish divings within all places worldwide. Upon completion of this course, you’ll be competent enough to dive within open water, and possess enough knowledge to remain safe. There’re several diving schools which provide PADI training, and you ought to have the ability to locate a great one within your local region without much complication. Many holiday places which are known for diving will possess diving centers which provide training for those who want to qualify for warmer surroundings.

The inital phase of the course will be a detailed theory module that covers every element of diving from technique and equipment to every vital safety aspect. It’s important that prior to somebody taking to the water, they possess knowledge of every one of the techniques involved. Discussing how the equipment operates, diving planning, breathing techniques, navigation and more, the theory portion of a course is made to offer the diver thorough knowledge of diving.

The practical portion of the PADI course practices everything that’s been studied within the theory module. In order to pass a practical exam, the diver has to prove that she or he knows the procedures and could safely dive. Covering aspects involving ascents and descents, underwater swimming, breathing and cramp relief and mask removal; the diver will be offered a thorough overview of diving and complete the course feeling confident concerning her or his new skill. Course costs typically cover insurance, equipment hire, and instructor and pool costs, so at this phase, there’s no obligation to spend a large quantity of money upon equipment.

Having finished the course, you’re now prepard to travel worldwide exploring underwater reefs, wrecks and several marine life forms. Holiday places like The Canary islands, Thailand and Egypt have become very common amongst scuba divers.

Discover Scuba Diving

If you’re conducting a Discover Scuba Diving program, that’s the more common certification of its kind, they’ll begin with a bit of paperwork, then show you to the instructor. Additional diving certification organizations such as SSI possess similar programs which follow similar, yet differing procedures, all possess the exact same goal; to have a good time and make you be confident and safe within the water.

Plus, you can get credit! If your Discover Scuba Diving program includes an actual scuba dive in open water, your experience may count toward PADI Scuba Diver or Open Water Diver certification, putting you a step ahead of the game when you decide to go for it.

Your instructor will probably have you view a flip chart. The Discover Scuba Diving flip chart will posses vital dive theories and crucial diving rules and ideas which are critical to remember, like the golden rules of diving, 1) Never hold your breath, 2) Equalize your air spaces and ears each couple of meters or as pain is felt.

Next, your instructor will conduct a pre-diving brief explaining the skills, signals and procedures which you’re going to perform within the water, that involve skills for replacing and recovering the regulator, clearing your mask of water, as well as using and finding the different air source. There’re a few additional easy skills which you’ll be expected to perform. Your instructor will assist you with your equipment, then be sure that diving gear will be set up properly.

Then, your instructor will take the group within a pool, or shallow water, that you could stand in. Your instructor should discuss the skill which you’re going to perform, then you’ll go under the water together. Your instructor should first perform the skill, then ask every individual to conduct the skill.

Lastly, your instructor, in most instances, will take your group from the area of teaching, out to the region where they could take you on the underwater tour, showing you an entirely new world. For many, it’ll be a dream come true, and surely one that you’ll recall for a lifetime.

Some other learnings:

  • Learn what wearing scuba equipment feels like and how easy it is to move around underwater while wearing it
  • Find out what it’s like to breathe underwater and learn whether you can be comfortable there
  • Learn some basic skills and safety rules that will carry over to your full scuba certification course when you take the next step

Nitrogen Narcosis

Scuba diving will be an amazing leisurely sport which you’ll enjoy once you attempt it. It’s due to you getting the opportunity to interact with numerous vibrant sea creatures discovered residing amongst the gorgeously formed majestic stones and corals. There’re only a few ideas which you must understand about it so you’ll enjoy fully the exploration as you’re minimizing the risks included with the sport. The compressed air which the tank possesses has a combination of 78% nitrogen and 21% oxygen.

Nitrogen narcosis could lead to an effect almost like liquor intoxication and usually happens at more than 100ft. During this moment, a victim will suffer a lowering within his ability to comprehend things which are occurring around him and judgment ability will additionally be crucially impaired. At this point, he might perform things that must not be performed at all, such as removing his goggles or other vital portions of his diving gear such as his fins or regulator s.

If you view your diving companion showing symptoms of this condition, you need to instantly help him make a controlled rise upward toward the surface, while observing all abnormal behaviors which the companion may show. The symptoms involve decreased dexterity, anxiety that’s manifested within their body behaviors, increased excitability, over confidence in dealing with a crucial situation, and delayed response to auditory or visual prompts.

As you view these symptoms manifesting within your diving companion, or if you begin to sense the exact same symptoms yourself, instantly start an ascent toward shallow waters. As you get nearer to the surface, you’ll see the symtoms and effects slowly dissipate. Following this, don’t attempt to dive in again for the rest of the day.

Nitrogen narcosis could be prevented by remaining within shallow waters. Though 18m might not be your idea of an amusing diving exploration, it’s a safe depth that will prevent this condition from arising.

Suunto Movescount & Scuba Diving

New to the diving community is the revolutionary Suunto Movescount, a user friendly tool to share all of your sporting activities with the world. Mainly this community has been used for runners and bikers to share and record their times, as well as gain likes and achievements through the website.

Suunto has decided that they should give divers an equal opportunity to share their exciting dive adventures. Movescount is a great visual tool for you to gain instant satisfaction from posting your dives to the world and sharing them with other divers. With Movescount you can also log your own personal achievements without sharing with others if you’re feeling a little anti-social, or just want to surprise the world at a later date!


Scuba diving has been looking for a tool like this, and with Suunto being one of the leading suppliers of dive equipment it only seems fitting that they would have the tools to make this happen. The website has a nice interface, almost “Facebook like”, giving you the ability to add fans, follow athletes, join groups and customize your own profile. A digital logbook if you will, with the ability to access from anywhere at anytime. This is a also a great tool for finding new dive buddies and connecting with people that you have met through the site. So bringing your laptop on vacation can now be mixed with your dive computer to record even more information about your awesome dives, and to record your bottom time accurately. This is not ONLY a tool to record your scuba diving activity, it has almost every sport you can think of, and from martial arts to badminton you can record ALL of your sporting activities.

Every good technology company knows, if you make a web interface for your industry, you should most definitely make a tool to use it on the fly! Like the new Suunto D6i, which allows you to easily upload and store all of your dive information directly from your laptop to Movescount.com. The watch itself is not different in any way from the D6, adding an “i” has only given it the ability to transfer directly to the website without any data having to be input by the user. The Suunto D6 is a great wrist computer that could easily pull off being an expensive wrist watch. When I travel and teach scuba diving my D4 never leaves my wrist, maybe it is time for me to upgrade to the D6i and start tracking my moves! This technology is new, and will begin to be a very exciting craze of sharing your healthy movements to your friends and newly acquired fans.

You can take a tour of Suunto Movescount by Clicking Here

Check out www.scubadiverlife.com to learn all about diving if you aren’t a scuba diver already, if you are; check us out and then head over to www.movescount.com and sign up for your account!

Suunto D4 Dive Computer

The Suunto D4 is the basic model in the D line series. This is a great dive computer for recreational and beginner divers. If you are more technical and dive multiple times a week, we would suggest stepping it up a little.

The computer automatically activates when you are in the water. You want to make sure that if you switch into Nitrox mode that you must make sure you set the appropriate settings for your next dive. This is an important step you should take with any dive computer before a dive.


The major features of this dive computer are:

• User-friendly design featuring easy-to-read matrix display
• Three dive modes, including dedicated freedive mode,
• Continuous decompression with the Suunto RGBM algorithm
• Built-in dive planner for planning upcoming dives
• Optional PC interface for detailed graphical logbooks and dive data analysis
• Selection of optional colorful straps available

Make sure you are comfortable with the display as it is quite smaller than other dive computers. The Suunto D4 is a great first dive computer, one major difference than the models that sit up this model are that the computer does not offer any sort of navigation. This is why it makes a great watch for someone who is just getting into scuba diving or a recreational diver.

Personally, I have been using this watch for my dives and love it! I will definitely upgrade to a model with navigation when the time is right! Your dive computer should be one of your first purchases when you get into scuba diving. You are more aware when you are on your dives and know what’s going on with you as a diver.

You are never going to have a dive that is the same as an instructor or dive guide. You want to make sure you can take care of yourself when below the surface, and knowing YOUR depth and YOUR bottom time etc… it is very important.

Make sure you keep your receipt, like most dive watches you may need to get something fixed. In order to replace the battery on this watch you must send it to the factory, one can not do this task themselves.

Saturday, July 2, 2011

Project AWARE

Project AWARE Foundation works in partnership with divers and water enthusiasts to combat challenges facing underwater environments. We involve these volunteers in hands-on environmental activities like International Cleanup Day and The International Whale Shark Project. Project AWARE also inspires conservation by incorporating its messages in dive training materials as well as creating awareness and education campaigns like Protect the Sharks, Protect the Living Reef and AWARE Kids. The Foundation Grant Program funds grass-roots environmental projects that address key foundation focus areas, volunteer-supported community activism and critical research with direct contributions made by people like you. Follow cause on Facebook

Donations Go To…

PROJECT A W A R E FOUNDATION
A 501(c)(3) nonprofit

Positions

  1. Dive carefully in fragile aquatic ecosystems, such as coral reefs.
  2. Be aware of your body and equipment placement when diving.
  3. Keep your diving skills sharp with continuing education.
  4. Consider your impact on aquatic life through your interactions.
  5. Understand and respect underwater life.
  6. Resist the urge to collect souvenirs.
  7. If you hunt and or gather game, obey all fish and game laws.
  8. Report environmental disturbances or destruction of your dive sites.
  9. Be a role model for other divers in diving and non-diving interaction with the environment.
  10. Get involved in local environmental activities and issues.

Sea Shepard Cause

Please join the following Cause. These guys are called pirates but without them, the sea's/oceans are a free for all slaughter house, the marine life can't fight or talk for themselves, so please help out.


About

Sea Shepherd is a direct-action conservation group lead by Captain Paul Watson, a man whom author Farley Mowat calls "the world's most aggressive, most determined, most active and most effective defender of wildlife."

Join the official facebook page!
http://www.facebook.com/seashepherdco...

Goto the website. http://www.seashepherd.org/

Tell your friends.

Affiliated With

SEA SHEPHERD CONSERVATION SOCIETY

Donations Go To…

SEA SHEPHERD CONSERVATION SOCIETY
A 501(c)(3) nonprofit

Positions

  1. Defend
  2. Conserve
  3. Protect
A One Dollar from everyone who visits, will make a load of difference. Tell your friends as well. I'm sure you can spend a dollar, or have a look at there shop and purchase something cool, which also is a donation.

Wednesday, June 15, 2011

Deep Diving

As new divers, the seemingly arbitrary 20m depth restriction seems kind of foolish; after all, you’ve got your tables right? You just picked up that sweet computer from the shop that’s rated to 100m, so why can’t you go there? Well, to be frank, while deep diving is really an extension of fundamental skills you’ve learned as an Open Water Diver (or equivalent), there are a few things that set it apart and so additional training and familiarization is recommended before you charge down to 40m! The keys for safe deep diving are redundancy, equipment and situational awareness. Deep dives are different from regular, shallower dives because the environment can change quite a bit on the way down. Where the first 10m of a dive might be decent for vis and light, it might be near night diving conditions deeper. Absorption and turbidity eat away at the colours you can see, and your air supply dwindles faster. In addition to all that, narcosis effects can become more pronounced as well, adding an element of risk all its own to the dive.


Ensure to check your Depth

Wreck Diving does get deep


Safety Stops are a must

If you’re planning a deep dive, plan for all reasonable contingencies. Use redundant equipment for vital things like your depth gauge (probably the most important redundancy). Carry at least one dive light, but a secondary is never a bad plan. Talk to local divers and find out the conditions that you might be facing when you get to the bottom. If it’s a wall dive, watch your depth gauge(s) like a hawk! Some computers can be set for deep stops, so this is a good option as well. Situational awareness is a trait that good divers seek to develop as much as possible over their diving careers. In a deep dive, it’s as important as it would be on a night or wreck dive. Paying attention to your depth, watching your dive buddy and yourself for narcosis and keeping track of your air are the most key things to watch. And finally, brush up on your certifying agencies emergency decompression stop rules and write them on your slate so you don’t forget. You’re already increasing your risk of DCI, so there’s no sense increasing it further by blowing your tables and not taking the needed stop. Safety stops aren’t optional with deep dives!

Planning and conducting deep dives is a big part of diving for me and many other people, particularly the Tec set. While you are able to go to whatever depth you want, it’s good to get the extra training (and master Dalton’s Law) before you just plunge in. 40m is a long way from the surface and a safe dive is a good dive!